May 4, 2016

While waiting for files to upload, I've fallen in love with the WeTransfer monsters.

April 27, 2016

Great illustration -- It reminds me of a combination of Dali and Escher, but with horses.

October 31, 2012

Hanging Quotes in InDesign

Hanging quotes and hanging punctuation in InDesign are very easy to create, adjust, and undo. Lets say that you have a section of text that contains quotation marks. The quotation marks should hang to the left on the body of copy. All of the other characters are aligned left. The glyph is the only thing that extends into the margin. Here's how to accomplish this:

1) Create a text box that contains a quotation mark at the beginning.


2) With the text box selected, go to Type > Story.

3) In the Story pallet, click the check box next to "Optical Margin Alignment"

4) With the box checked, the quotation marks hang into the left margin. 


Optical Margin Alignment is also useful when dealing with fully justified text. Take note of the positioning of the quotation marks and the hyphens in the following two images.

A justified text box will look like this:


 With optical margin alignment, it will look like this:


October 22, 2012

Urbane Reclamation Furniture Restoration

This past week I was fortunate to be able to visit Urbane Reclamation, an upcycled furniture business in Pittsburgh's East End. The owner and founder, Emily Bush gave me a tour of her shop showed me her showcase of finished projects. All of her pieces have been gently used and need just a little TLC to get them looking spiffy again. While visiting, she even let me have a hand at refinishing a chair! Here's how the process works:

Emily picks out pieces of furniture based off of their current condition, aesthetic value, and time period. She has a lot of Victorian-style pieces. This is a typical style found in the area. The East End has many Victorian homes, and estate sales are very frequent.

She had several chairs waiting to be refinished so we chose a straight-back chair with a cushioned seat. We started by popping off the upholstery tacks from the seat. Under the cushion cover we discovered another layer of fabric, and another, and another! This chair had four layers of different fabric on it. It's previous owner must have remodeled a lot, or been very indecisive. Needless to say, we had to remove four sets of tacks, staples, nails and screws! It took us about an hour and a half to remove all the metal bits.

Once the chair was stripped of all the hardware, fabric, springs, and support, we sanded with coarse sand paper. Emily explained that the coarse sanding would help the primer adhere to the wood. If this were going to be stained, we would go over it again with a finer grain sand paper to smooth out the texture. Since we were going to paint, we just needed to do a rough scrubbing. After we abraded the surface, we wiped it down with a damp cloth. This was followed with a layer of primer.

Over the next day or two Emily will fill in the nail holes, smooth out the rough edges and apply the final layer of primer. A layer or two of paint will follow, and be finished off with a matching cushion. Check back in soon for the finished piece!

October 16, 2012

Combining Disconnected Text in Illustrator

Opening PDFs in Illustrator may cause some elements to behave strangely. Text boxes in particular are often affected. Type will many times break into smaller text boxes, with words or individual letters in their own box. This can be very impractical and annoying if you're trying to make edits to the document.

Below is an example of a PDF that I opened in Illustrator. On the baseline, the tiny blue squares indicate the start of a new text box. In this example the text is broken at at least once per word.


Notice how you can select an individual character or sets of characters and drag them around. Not cool.


If you want to edit the type, you must first combine all of the characters or retype them all. Here's an easy solution for getting all of those individual letters grouped together.

1. With your selection tool, select all of the characters that you want to combine. Clicking and dragging your cursor over all of the text boxes is an effective way to select all of the characters and words.


Copy them all (Command + C) or Control + C if you're on a PC.
     

2. With your type tool, draw a text box


3. With the text box still selected with the type tool, press Apple + V (Control + V)

     
4. The type will flow itself into this new text box, without all of the awkward breaks.


Helpful Hint: If you're flowing a LOT of copy, it may not always copy in the correct order. If there are paragraph breaks, try to select one paragraph at a time to copy and paste.

Another Helpful Hint: For illustration purposes only, I have the bounding boxes showing in steps 2 and 3 and hidden in all other examples. If your screen doesn't look exactly like mine, it may be due to the display of the bounding boxes. To toggle this view go to: View > Show Bounding Box or View > Hide Bounding Box

July 16, 2012

Calculator Shortcut in Spotlight - Mac OSX

I love the finder on a mac. Not only does mac's Spotlight perform a quick search, but it also does math! You don't even need to open up the calculator. Simply open Spotlight and type in basic math functions.

1) Command + Space
This is the shortcut to open Spotlight

2) Type in your math equation. Voila! You have your answer right here.

December 31, 2011

Placing a multiple page PDF, or multiple artboard Illustrator file into InDesign

You can place many types of objects into InDesign including Adobe Illustrator files and pdfs. I've always struggled with placing pdfs with multiple pages, or Illustrator files with multiple artboards. In the past if I wanted to import other than the first page of a pdf, I'd save just that page by itself, then place that file in InDesign. This is a very inefficient way to manage files. I recently discovered a way to import other pages or artboards into InDesign.

1) In InDesign go to File > Place


2) In the pop-up dialogue box you will see three options at the bottom. (In CS4 there are only two check boxes)
CS5

CS4


Check the box that says "Show Import Options"

3) In the window, find and select your PDF or Ai file you want to import. Click "Open"

4) In this second pop-up window you will see import options for the file. Select a single page/ artboard or a range. Then click "OK"


Note: InDesign will remember that you checked the "Show Import Options" the next time you go to place a file. You will see this screen each time until you uncheck the box.

September 30, 2011

Unlink Text Threads in Indesign

In Indesign you can flow text from one text box to another which allows the story to dynamically move as you add or remove text. If you decide that you don't want the text boxes to be linked, here is how to unlink the text boxes, or unflow the text.

1) Select at least one of the text boxes that contains flowing text.

2) Go to Window > Utilities > Scripts

3) In the Scripts panel navigate to Application > Samples > JavaScript > SplitStory.jsx
Double-click on the "SplitStory.jsx" text.

4) Your text will now live within its current box. It will not flow from one to the other.

August 2, 2011

Bridge Italicized Keywords

Why are my keywords in Bridge italic? Why do my keywords disappear from Bridge? Aaah, keywords can be frustrating, but they don't need to be.

In Bridge some keywords are temporary, appearing when you view an image that is tagged with that keyword and disappearing when you restart Bridge. These are keywords that were added by other users. If you do not have the same keywords saved to Bridge, then they will appear in italic, indicating that they are temporary.

Ok, here's an example.
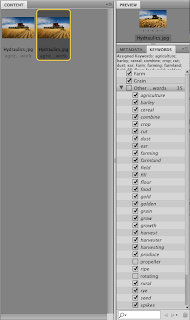
In Bridge I have selected a photo of some farming equipment (I believe it is a combine).
Notice in my keywords pallet there are many keywords that are checked. The two words at the top. "Farm" and "Grain" are in normal type. The keywords under the category "Other Keywords" are italic. The italicized words are not part of the permanent keyword collection. They appear when you select an image that has been tagged with those keywords. They will remain (in italic) in my keywords panel until you close bridge.


If you want the keywords to display all the time in Bridge, then you must make them permanent. Here's how.

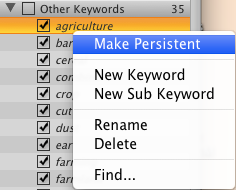
1) Right click the keyword. (It does not have to have a checkmark in front of it). Choose "Make Persistent"

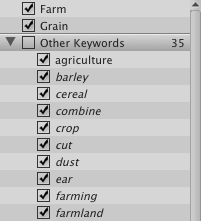
2) Now the keyword "Agriculture" is not italic. This means that if we close Bridge and reopen it, the keyword will still be there.

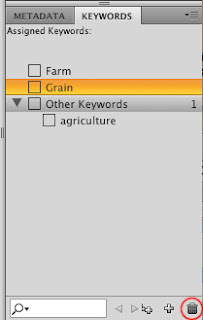
3) Close Bridge and reopen. Notice that "Agriculture" is still on the list, and all the other italic words are no longer there. That's because we made it persistent and it now permanently in our Bridge collection.


To remove a keyword, just select the keyword and then click on the trashcan icon in the bottom right-hand corner. The keyword will be removed from Bridge. If you then select an image that had previously been tagged with this keyword, it will appear in italic.


June 21, 2011

Importing a Library in Bridge

How do I import keywords into Bridge?
Importing keywords is very easy and it is beneficial in a group setting, like my office for example. We want everyone tagging images to have access to the same set of keywords. This reduces the number of mistakes due to hand-keying in terms. The library can be created and imported by following these easy steps listed below. They can also be found on Adobe's site here (scroll down a bit) or on This Site (better step-by-step instructions).

1) In a text editor such as Word or Pages, create a plain text document. This file type will have the ending .txt.
OR
You can also create a system of keywords in in Excel.
2) Add your keywords, with these restrictions:
• Place one keyword per line
• Create sub categories by indenting keywords
You can put your keywords in any order, but Bridge will automatically alphabetize them.
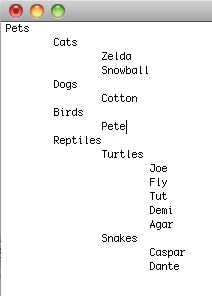
In my example I have a list of pets. Notice the order they are in.

3) In Bridge, go to your keywords panel and click on the small drop-down arrow in the top right-hand corner. Click on Import.

4) Find the document on your machine and then click "Open".

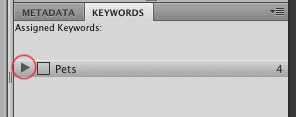
5) The keywords are now added to your list. In my pet example, I had "Pets" as the main category. You will see that's the only item in my new keyword list. I need to click the little arrow beside it to see the sub categories.

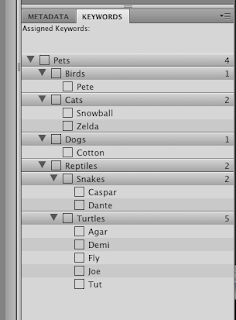
Notice in the expanded list below that the items are alphabetized. The category "Birds" comes first, etc.

Notes:
• When importing keywords, you will not overwrite the existing keywords that you already have in Bridge
• If you import a set of keywords, modify the text file and re-upload, it will only add new keywords. It will not overwrite, even if you're uploading the same-named text file.
• To Delete keywords you must drag the keyword to the trashcan icon within Bridge. Or select the keyword and click the trashcan icon.

April 13, 2011

Adobe Acrobat Selected Form Field Color

In Adobe Acrobat there are two coloring options in the fields:


• The background of the field.(default is blue-grey)

• The color of the field while the user is entering information. (default is transparent)


This post covers the second option. If you're interested in eliminating the blue-gray background in all fields, visit this post.


Here's the PDF with form fields added.


When I select the first field, the grey coloring disappears.


1) To change the color while editing, go to Edit >

Add or Edit Fields


2) In this example I'm going to change the color for the "Name" field.

Right click on your field and select "Properties..."


3) Click on the "Appearance Tab"

Then click on "Fill Color"

I chose orange.


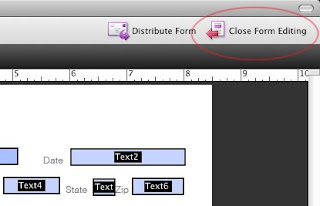
4) Back in the document close the form editing by clicking on the icon in the top-right corner.


Now when my cursor is in the "Name" field, it turns orange. When I tab out, or the field is no longer active, it will go back to the grey.