Showing posts with label InDesign. Show all posts

October 31, 2012

Hanging Quotes in InDesign

Hanging quotes and hanging punctuation in InDesign are very easy to create, adjust, and undo. Lets say that you have a section of text that contains quotation marks. The quotation marks should hang to the left on the body of copy. All of the other characters are aligned left. The glyph is the only thing that extends into the margin. Here's how to accomplish this:

1) Create a text box that contains a quotation mark at the beginning.


2) With the text box selected, go to Type > Story.

3) In the Story pallet, click the check box next to "Optical Margin Alignment"

4) With the box checked, the quotation marks hang into the left margin. 


Optical Margin Alignment is also useful when dealing with fully justified text. Take note of the positioning of the quotation marks and the hyphens in the following two images.

A justified text box will look like this:


 With optical margin alignment, it will look like this:


December 31, 2011

Placing a multiple page PDF, or multiple artboard Illustrator file into InDesign

You can place many types of objects into InDesign including Adobe Illustrator files and pdfs. I've always struggled with placing pdfs with multiple pages, or Illustrator files with multiple artboards. In the past if I wanted to import other than the first page of a pdf, I'd save just that page by itself, then place that file in InDesign. This is a very inefficient way to manage files. I recently discovered a way to import other pages or artboards into InDesign.

1) In InDesign go to File > Place


2) In the pop-up dialogue box you will see three options at the bottom. (In CS4 there are only two check boxes)
CS5

CS4


Check the box that says "Show Import Options"

3) In the window, find and select your PDF or Ai file you want to import. Click "Open"

4) In this second pop-up window you will see import options for the file. Select a single page/ artboard or a range. Then click "OK"


Note: InDesign will remember that you checked the "Show Import Options" the next time you go to place a file. You will see this screen each time until you uncheck the box.

September 30, 2011

Unlink Text Threads in Indesign

In Indesign you can flow text from one text box to another which allows the story to dynamically move as you add or remove text. If you decide that you don't want the text boxes to be linked, here is how to unlink the text boxes, or unflow the text.

1) Select at least one of the text boxes that contains flowing text.

2) Go to Window > Utilities > Scripts

3) In the Scripts panel navigate to Application > Samples > JavaScript > SplitStory.jsx
Double-click on the "SplitStory.jsx" text.

4) Your text will now live within its current box. It will not flow from one to the other.

March 14, 2011

Ignore Text Wrap InDesign

The Text Wrap feature is great for flowing text around an object. This is applied to the image, and all text that encounters the object will be forced to wrap. However if you want some text to overlay the image, or come within close proximity, it must be allowed to break that Text Wrap Frame.

Here's how:

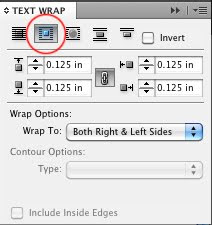
1) Create your text box and object and set your object to "Text Wrap". In this example I have it to wrap around the bounding box and to have a .125" offset the entire way around the object.


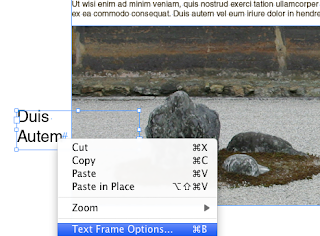
2) Select the text box that you want to ignore the Text Wrap. (In my example I want the words "Duis Autem" to appear overtop of the image.) Right click on the text and select "Text Frame Options"


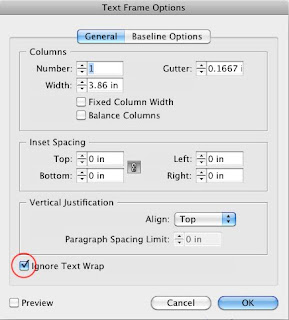
3) In the pop-up window, click on "Ignore Text Wrap", then click "OK"

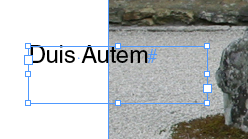
4) Now the text ignores the wrap.


December 17, 2010

InDesign Printing Pages Out of Order

I recently found one more small useful tool for printing in InDesign. It's not a major feature, and I don't think it is used that often. However, someday you may want to print your pages in a non-sequential order. It's very easy to do.

1) Make sure you have an InDesign document with multiple pages. Next, pull up the "Print" dialogue box from the File menu.


2) Click on the "Range" button. You can type in the pages you want to print. The order you key them in as, will be the order that they print. Notice that I will print page 3,1, pages 4 through 6, then page 2. You can include ranges (4-6) or individual pages (5,2,8) in your range field.

October 8, 2009

Setting Adobe shortcuts

Shortcuts are a lifesaver.
However, the keystroke presets vary among all of the Adobe programs.
For example cmd+F is "Find" in InDesign. It is "Paste in Front" in Illustrator. This becomes very confusing if you frequently use both programs. I find myself with the "Find Text" dialogue box when I really want to paste an object on top.
If you use many Adobe programs, it is useful to have all of your commands be universal.
Use a bit of discretion when reassigning all of your shortcuts; there are several functions that are more important than others, depending on the program. So if you choose an operation to be universal, make sure that it is truly saving you time in all the programs.

Here's how to set your own shortcuts:
1) In ANY Adobe program go to Edit>Keyboard Shortcuts


2) You will see a new window with an overwhelming number of options.
To simply define a single action, click on the "Product Area" drop-down box.


3) In this example I will be changing the "Save As" function.
This is particular function is located under "File Menu".


4) Highlight the "Save As" command.


5) You will see the current preset shortcut(if one is not defined, this will be blank).
You can click the "Remove" button to remove it, or proceed to Step 6 to find out how to redefine the shortcut.


6) With the "New Shortcut" box selected, press the new keystrokes that you would like to use.
If you would like to assign them to a particular keystroke set, click on the "Context" dropdown box. Otherwise, the simpler way is to click the "Assign" button.
You have now successfully assigned a new keyboard shortcut!


Some key ones that I use often, on all of my Adobe programs are:
Save: cmd S
Export: cmd E
Place: cmd D
Zoom in: cmd +
Zoom out: cmd -
Zoom 100%: cmd 0


For the full list of shortcuts:
Adobe Indesign CS4
Adobe Photoshop CS4
Adobe Illustrator CS4


August 14, 2009

Using the "Align to Decimal" tab in InDesign

Set a character for the decimal tab.

This tutorial will demonstrate how to line up items in a list. 

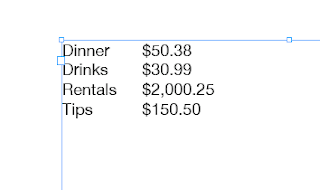
In this example I will be using 2 columns of information, and aligning the decimals in the second column.


1) Type your information. Press the "Tab" key to separate your left column from the right.

If your dollar signs do not line up, don't worry. This may happen if your first column contains a lot of text.


2) Open the Tabs palette (Type>Tabs)


3) Click on the "Align to Decimal" icon in the top left.

When you click this button, notice that the "Align On" box becomes highlighted. Click on the white text field here, and type in the decimal or period.

4. Now you must tell InDesign where you want the decimals to line up.

Select all of your text and click on the ruler on the Tabs bar. A new "tab" will appear on this ruler.

5. You can move the tab manually, or specify the exact numeric location.

To move the tab manually, simply click on the tab icon on the ruler(It's circled in red in the above diagram), and drag it left or right.

To set the exact location, click on the field following the "X:" Type in the value and press return.


*Note if you specify a "Left Justified" tab before an "Align to Decimal", the decimals will not align. Remove the "Left Justified" tab and allow your decimals to align.

You can also view
Adobe's tutorial here.