Showing posts with label CS2. Show all posts

June 21, 2011

Importing a Library in Bridge

How do I import keywords into Bridge?
Importing keywords is very easy and it is beneficial in a group setting, like my office for example. We want everyone tagging images to have access to the same set of keywords. This reduces the number of mistakes due to hand-keying in terms. The library can be created and imported by following these easy steps listed below. They can also be found on Adobe's site here (scroll down a bit) or on This Site (better step-by-step instructions).

1) In a text editor such as Word or Pages, create a plain text document. This file type will have the ending .txt.
OR
You can also create a system of keywords in in Excel.
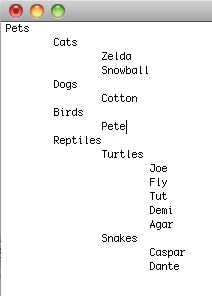
2) Add your keywords, with these restrictions:
• Place one keyword per line
• Create sub categories by indenting keywords
You can put your keywords in any order, but Bridge will automatically alphabetize them.
In my example I have a list of pets. Notice the order they are in.

3) In Bridge, go to your keywords panel and click on the small drop-down arrow in the top right-hand corner. Click on Import.

4) Find the document on your machine and then click "Open".

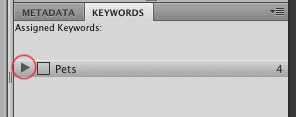
5) The keywords are now added to your list. In my pet example, I had "Pets" as the main category. You will see that's the only item in my new keyword list. I need to click the little arrow beside it to see the sub categories.

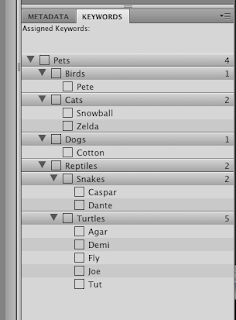
Notice in the expanded list below that the items are alphabetized. The category "Birds" comes first, etc.

Notes:
• When importing keywords, you will not overwrite the existing keywords that you already have in Bridge
• If you import a set of keywords, modify the text file and re-upload, it will only add new keywords. It will not overwrite, even if you're uploading the same-named text file.
• To Delete keywords you must drag the keyword to the trashcan icon within Bridge. Or select the keyword and click the trashcan icon.
March 14, 2011

Ignore Text Wrap InDesign

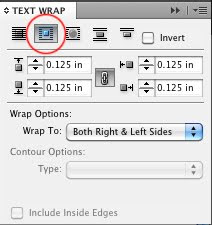
The Text Wrap feature is great for flowing text around an object. This is applied to the image, and all text that encounters the object will be forced to wrap. However if you want some text to overlay the image, or come within close proximity, it must be allowed to break that Text Wrap Frame.

Here's how:

1) Create your text box and object and set your object to "Text Wrap". In this example I have it to wrap around the bounding box and to have a .125" offset the entire way around the object.


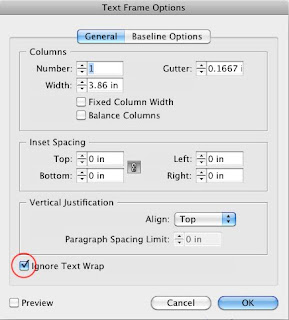
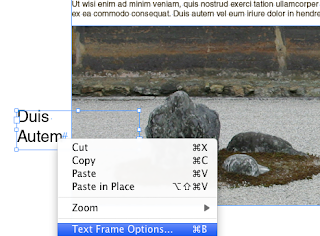
2) Select the text box that you want to ignore the Text Wrap. (In my example I want the words "Duis Autem" to appear overtop of the image.) Right click on the text and select "Text Frame Options"


3) In the pop-up window, click on "Ignore Text Wrap", then click "OK"

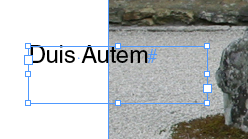
4) Now the text ignores the wrap.


December 17, 2010

InDesign Printing Pages Out of Order

I recently found one more small useful tool for printing in InDesign. It's not a major feature, and I don't think it is used that often. However, someday you may want to print your pages in a non-sequential order. It's very easy to do.

1) Make sure you have an InDesign document with multiple pages. Next, pull up the "Print" dialogue box from the File menu.


2) Click on the "Range" button. You can type in the pages you want to print. The order you key them in as, will be the order that they print. Notice that I will print page 3,1, pages 4 through 6, then page 2. You can include ranges (4-6) or individual pages (5,2,8) in your range field.

November 22, 2010

Outline text or fonts in Illustrator

In Illustrator fonts remain editable text by default. You can change the text, delete the text or kern it. If you so desire, you can convert your text to outlines. By doing so you can then manipulate the text curves and paths. However, once you converted to outlines, it is no longer editable with the text tool.

Here is how to convert your text to outlines:

1) Draw a text box and type your word, phrase, sentence, paragraph, etc. Here is my sample text. Notice the thin blue line directly under the baseline of the text. This is Illustrators way of indicating editable text with the text tool.


2) With your text selected, go to Type > Create Outlines.


3) Notice that your text is now outlined. There is no thin line under the text and all the individual anchor points for the characters are visible.


Once you convert your text to outlines, you may not undo. There is no "convert to text" option in Illustrator. I recommend finalizing your layout and text and only convert to outlines at the end. You can also make a duplicate of your text(simply copy and paste), so if you need to make an edit, you still have the original text.

Here is Adobes tutorial for CS3, CS4, CS5

July 12, 2010

Knife Tool In Illustrator

The Knife tool in Illustrator can be used to cut a shape into smaller segments. The tool can be used to cut straight lines, or make more freehand cuts.

The Knife tool is located in a different place depending on which version of Illustrator you have. Below, I have shown where the knife tool is located in CS2, CS3, CS4, & CS5.

CS2 CS3 CS4 CS5


I'm going to go over how to do 3 things with this tool:
I) Make a freehand cut
II) Make a straight line cut
III) Make a straight line cut on 90º angles

For all of these steps we're going to need to create a shape. In this example, I'm using a green box with a pink stroke.
I'm going to select the box, and then select my knife tool.
+


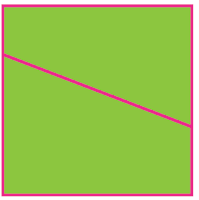
I) Making a freehand Cut
Click and drag your knife tool over your shape.
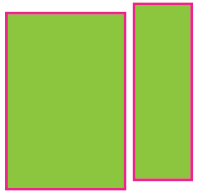
Notice that you will now have two segments. In my example this is evident by the pink outline, around my newly created 2 shapes. You can now use your selection tool(the normal arrow) and move the pieces around.


II) Make a straight line cut
Hold down the Option keyand click and drag your knife tool over the shape. Notice that the line you are drawing is straight. No matter how wobbly your hand is, your line will be straightened. If you are a Windows user, press the Alt key instead of Option.

+


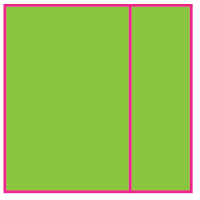
III) Make a straight line cut on 90º angles
Hold down Option + Shift and click and drag your knife tool over the shape.
If your line is close to vertical, then it will snap to a perfectly vertical line. If it is close to 45º then it will snap to that angle. In my example the line I drew was closeto vertical, and I ended up with a perfectly vertical line! If you are a Windows user, press the Alt key instead of Option.
+ +


Note:
Above, I stated that you must first select your shape. You do not have yourobjects selected for the knife tool to work. Simply dragging the knife tool over an object, selected or not, it will break that object into segments.

If you have 2 objects overlapping, or close to each other, the knife tool behaves differently.
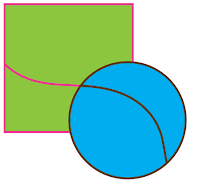
With both objects selected, and you use the knife tool, they will both be cut as seen below.

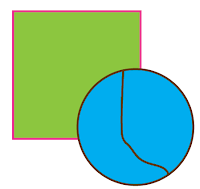
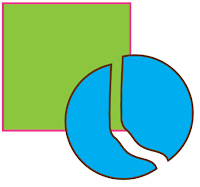
In this example, I selected only the blue circle. When I drag the knife tool over the shapes, only the blue circle is affected.

May 26, 2010

Ilustrator Live Trace Tutorial

Live Trace is a great tool for converting rastered images to vector in Illustrator. I personally do not use this tool very often. I find that to create a true Illustration, the artwork should be done by hand and then traced in Illustrator using the pen or pencil tool.
However, I will run through this tutorial, because it is a nice shortcut to create stylized photographs.

1) With Illustrator open, place a rastered object into Illustrator. A raster file will be most commonly a jpg, png, gif, bmp. As you can see in the screenshot, I've set mine to have a shortcut of Apple+D. Refer to This Article for how to set your own keyboard shortcuts.

2) Now you have an image in your Illustrator document. With your image selected, go to Object>Live Trace>Tracing Options.

A shortcut for Live Trace can also be found on the Control Bar along the top of your screen. Click on the down arrow and then on "Tracing Options"


3) The pop-up box will give you many different options to choose from.
I like to arrange my screen so that I can see the image that I'm working on, as well as the entire pop-up box.


4) By adjusting the Tracing Options, you can achieve many different looks.
You can see what your final product will look like by clicking the Preview Button on the right side of the box. Be careful when you check this. If you have a complex image, or a slow(older) computer, it will take a while to render.


5) For this example, lets say I want a color image. I changed the "Mode:" to "Color" Then, I adjusted the "Max Colors". By adjusting this number, I found the correct value that gave me the result that I was looking for. Too many colors and it will look no different that the photograph. Too few colors and it will look like a bunch of blobs on the canvas. The value that I found to work best was "8". Then click the "Trace" button on the right-hand side.

6) Now I have an image that is vectorized. But what can I do with it now? When the image is clicked, it remains as a group, and the individual segments and pieces are not selectable. If this is fine with you, then you're finished. If you want to break the new image into alterable segments, read on.


7) With the image selected, go to Object>Expand. In the pop-up box make sure the "Object" box is checked.


8) You can see all of the paths for each individual shape. It looks like a nightmare to make any adjustments. This isn't the cleanest way to make illustrations, but it will get you by in a pinch.