
CS2 CS3 CS4 CS5


I) Make a freehand cut
II) Make a straight line cut
III) Make a straight line cut on 90º angles
For all of these steps we're going to need to create a shape. In this example, I'm using a green box with a pink stroke.
I'm going to select the box, and then select my knife tool.
 +
+ 
I) Making a freehand Cut
Click and drag your knife tool over your shape.
Notice that you will now have two segments. In my example this is evident by the pink outline, around my newly created 2 shapes. You can now use your selection tool(the normal arrow) and move the pieces around.


II) Make a straight line cut
Hold down the Option keyand click and drag your knife tool over the shape. Notice that the line you are drawing is straight. No matter how wobbly your hand is, your line will be straightened. If you are a Windows user, press the Alt key instead of Option.


 +
+ 
III) Make a straight line cut on 90º angles
Hold down Option + Shift and click and drag your knife tool over the shape.
If your line is close to vertical, then it will snap to a perfectly vertical line. If it is close to 45º then it will snap to that angle. In my example the line I drew was closeto vertical, and I ended up with a perfectly vertical line! If you are a Windows user, press the Alt key instead of Option.


 +
+  +
+ 
Note:
Above, I stated that you must first select your shape. You do not have yourobjects selected for the knife tool to work. Simply dragging the knife tool over an object, selected or not, it will break that object into segments.
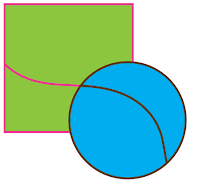
If you have 2 objects overlapping, or close to each other, the knife tool behaves differently.
With both objects selected, and you use the knife tool, they will both be cut as seen below.

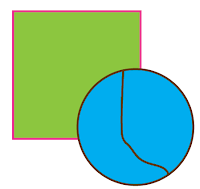
In this example, I selected only the blue circle. When I drag the knife tool over the shapes, only the blue circle is affected.

35 comments:
Thanks for making things easy to understand. I'm a long time Illustrator user, but I hadn't bothered to learn how to use the knife tool; I think I managed to confuse myself the only other time I tried. Your diagrams and explanation enabled me to use it right away and do what I needed to do. Thanks!
Dawson
Hi Dawson, I'm glad you found this useful!
Thanks so much for teaching this, glad to see a clear and efficient tutorial for once :)
Nice and clear explanation, thank you!
Very helpful. Simple and straight to the point :)
Thanks for the simple and clear instructions. I have been a dedicated Freehand user but have upgraded my computer beyond it. I am now teaching myself Illustrator. I will be back again to your site. Thanks so much.
Norma
for some reason, I'm not able to get a straight line from the knife and cmd key together. Please help! thanks
For a straight line, you need to hold down the "Alt/Option" key. First, select your object, then press "Alt/Option". Click your mouse to start using the saw tool and you will have a straight line!
Thank you! This is much better than anything I found on Adobe or those terrible "howto" sites. Trust a graphic designer to be able to present an idea with clarity ;-)
Hi Im trying to cut off an angled portion off a line to make it fit flush against another object; can't cut line with knife tool.
I read your post attentively. Really i enjoyed it. thanks a lot for your nice sharing
ive tried your method but thee whole shape keeps moving
Good tutorial.
clipping path service
Really useful blog. It's very helpful for my design. Thanks for sharing :)
What a lovely post! So much needful for us.Thank you
clipping path service provider
The article was up to the point and described the information very effectively. Thanks to blog author for wonderful and informative post.
infinite logo
logo design app
Great tutorials. It's very helpful to me. Thanks for sharing. clipping path service
I really enjoyed your blog Thanks for sharing such an informative post.
Well written. I am really looking for these kinds of posts for a long time. Thank you for sharing this with us. Visit us: Clipping Path
Excellent website. I appreciate your post. Thanks
I really enjoyed reading your article.
Best Regards:
clipping path services
Very nice tutorial. it helps any beginner photographer. we are clipping path service provider in worldwide. our most popular service clipping path service if you need please contact with us...
Thanks!
So useful and informative blog you have shared. I have read and applaud this published. Thank you guy. Image Retouching
Clipping Path
Neck Joint
Background Remove Service
Drop Shadow Helps
Photo Cut Out
Image Editing
Image Manipulation
eCommerce Photo Editing
Clipping Path Tutorial
I really like reading your post. You sort of post with very informative information. Hope more articles
Best Regards,
Clipping Path
This article got my mind. Thank you so much for this wonderful article. It helped me a lot.
Best Regards,
Clipping Path
I really like your post. You sort of post with very informative information. Retouching
Fantastic tutorial you have got here. Liked it very much. Thanks for sharing with us.
This is clearly a well thought post and it is very good. Great work. Thanks.
High End Photo Retouching Service
Post a Comment