

I found a tutorial for how to make your own Photoshop brushes. It allows you to make your own unique, customized brushes.
I tried the tutorial and found a few modifications you can make to the brushes.
Follow the first 5 steps of the tutorial:
1-4) Create a mark, design, or stroke.
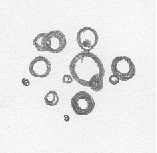
Instead of using a brush and paint,I drew a design with a pencil.
Here's what my design looks like.
5) Scan the images into Photoshop and save as high resolution PSD's.
In my image the the color of the paper did not scan in as pure white.
I want to eliminate some of the grey background so that it doesn't show up on my brush. I created a step 5a to make the background white and the design darker.
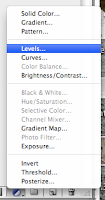
5a)Adjust the levels of the drawing to increased the contrast. My preferred method is to go the the layers palette and create a new "Levels" layer.

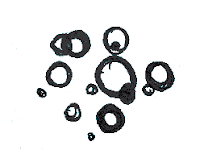
Now the grey background is gone and I'm left with only the circles.
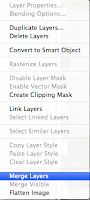
On your Layers Palette select the layer that contains your artwork and the layer that has the adjustment levels. Right click on the either layer name and select "Merge Layers".
6) Select your new layer and go Edit > Define Brush Preset. Save your brush. It will now appear in your brush palette.

To change the appearance of your new brush, go to your brush palette. If your brush palette is not visible go to Window > Brushes.

With this palette you can change the brush size, opacity, rotation, etc. Experiment and see what kinds of effects you can get!
