
However, the keystroke presets vary among all of the Adobe programs.
For example cmd+F is "Find" in InDesign. It is "Paste in Front" in Illustrator. This becomes very confusing if you frequently use both programs. I find myself with the "Find Text" dialogue box when I really want to paste an object on top.
If you use many Adobe programs, it is useful to have all of your commands be universal.
Use a bit of discretion when reassigning all of your shortcuts; there are several functions that are more important than others, depending on the program. So if you choose an operation to be universal, make sure that it is truly saving you time in all the programs.
Here's how to set your own shortcuts:
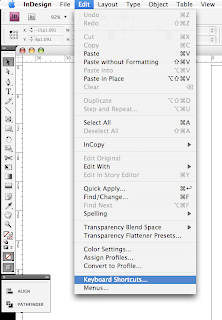
1) In ANY Adobe program go to Edit>Keyboard Shortcuts
2) You will see a new window with an overwhelming number of options.
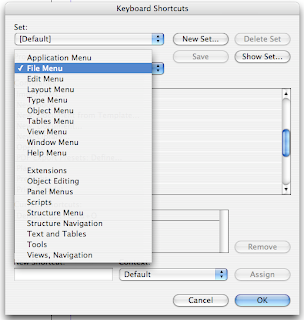
To simply define a single action, click on the "Product Area" drop-down box.
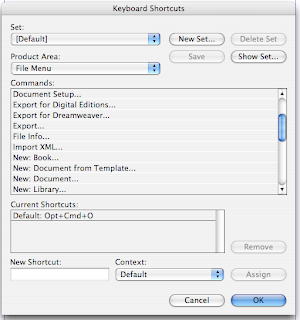
3) In this example I will be changing the "Save As" function.
This is particular function is located under "File Menu".
4) Highlight the "Save As" command.

5) You will see the current preset shortcut(if one is not defined, this will be blank).
You can click the "Remove" button to remove it, or proceed to Step 6 to find out how to redefine the shortcut.
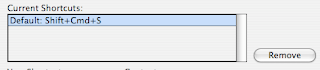
6) With the "New Shortcut" box selected, press the new keystrokes that you would like to use.
If you would like to assign them to a particular keystroke set, click on the "Context" dropdown box. Otherwise, the simpler way is to click the "Assign" button.
You have now successfully assigned a new keyboard shortcut!

Some key ones that I use often, on all of my Adobe programs are:
Save: cmd S
Export: cmd E
Place: cmd D
Zoom in: cmd +
Zoom out: cmd -
Zoom 100%: cmd 0
For the full list of shortcuts:
Adobe Indesign CS4
Adobe Photoshop CS4
Adobe Illustrator CS4
Here's how to set your own shortcuts:
1) In ANY Adobe program go to Edit>Keyboard Shortcuts

2) You will see a new window with an overwhelming number of options.
To simply define a single action, click on the "Product Area" drop-down box.

3) In this example I will be changing the "Save As" function.
This is particular function is located under "File Menu".

4) Highlight the "Save As" command.

5) You will see the current preset shortcut(if one is not defined, this will be blank).
You can click the "Remove" button to remove it, or proceed to Step 6 to find out how to redefine the shortcut.

6) With the "New Shortcut" box selected, press the new keystrokes that you would like to use.
If you would like to assign them to a particular keystroke set, click on the "Context" dropdown box. Otherwise, the simpler way is to click the "Assign" button.
You have now successfully assigned a new keyboard shortcut!

Some key ones that I use often, on all of my Adobe programs are:
Save: cmd S
Export: cmd E
Place: cmd D
Zoom in: cmd +
Zoom out: cmd -
Zoom 100%: cmd 0
For the full list of shortcuts:
Adobe Indesign CS4
Adobe Photoshop CS4
Adobe Illustrator CS4