I have found this dictionary to be a resourceful tool for Flash.
Flash ActionScript Dictionary
If you need a refresher for Flash's syntax, this comprehensive list provides symbolic operators and ActionScript elements. Listed under each entry there are examples for how to use them.

November 18, 2009
November 10, 2009
Tables in InDesign
If you have ever created a table in InDesign, you know there can be some nuances about the table.
First, the "text box" can be smaller or larger than the table, and all of the content will still display correctly. However, if the cell size is too small to fit all the text in, then the text will be cut off.
Coming back to my main point: the "Tab" key within a table.
If you have a table and press the "Tab" key, then it brings you to the next cell. What if you want to create a tab WITHIN that cell?
Here's how:
Option+Tab
Here's the Tutorial:
Create a table in InDesign.
1) Type your information. Press the "Tab" key to separate your left column from the right.
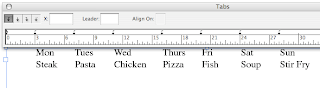
2) Select the text.

3) Open the "Convert to Table" palette (Table>Convert Text to Table)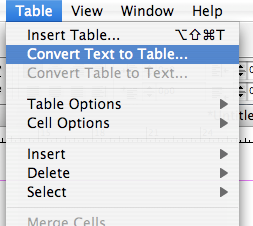
4) A pop up box will appear. It will contain the information for converting your text to a table.
The defaults will separate the columns by tabs, and the rows by paragraphs. This is what we want.
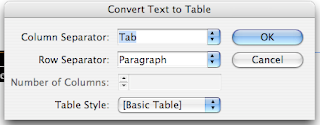
5) Press "OK". You now have a 2 row table with the days in separate columns.

6) Now I want to add ingredients to my menu, and I want them to be indented with the "Tab" key. I want to type in my pizza ingredients.
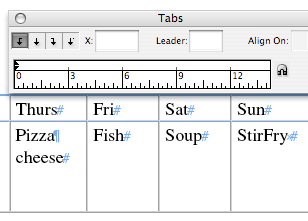
7) Set a tab
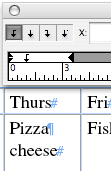
8) Press Option+Tab to indent the word cheese. If you press just "Tab", your cursor will move to the next box.
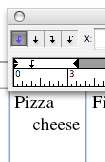
First, the "text box" can be smaller or larger than the table, and all of the content will still display correctly. However, if the cell size is too small to fit all the text in, then the text will be cut off.
Coming back to my main point: the "Tab" key within a table.
If you have a table and press the "Tab" key, then it brings you to the next cell. What if you want to create a tab WITHIN that cell?
Here's how:
Option+Tab
Here's the Tutorial:
Create a table in InDesign.
1) Type your information. Press the "Tab" key to separate your left column from the right.

2) Select the text.

3) Open the "Convert to Table" palette (Table>Convert Text to Table)

4) A pop up box will appear. It will contain the information for converting your text to a table.
The defaults will separate the columns by tabs, and the rows by paragraphs. This is what we want.

5) Press "OK". You now have a 2 row table with the days in separate columns.

6) Now I want to add ingredients to my menu, and I want them to be indented with the "Tab" key. I want to type in my pizza ingredients.

7) Set a tab

8) Press Option+Tab to indent the word cheese. If you press just "Tab", your cursor will move to the next box.

October 8, 2009
Setting Adobe shortcuts
Shortcuts are a lifesaver.
However, the keystroke presets vary among all of the Adobe programs.
For example cmd+F is "Find" in InDesign. It is "Paste in Front" in Illustrator. This becomes very confusing if you frequently use both programs. I find myself with the "Find Text" dialogue box when I really want to paste an object on top.
If you use many Adobe programs, it is useful to have all of your commands be universal.
However, the keystroke presets vary among all of the Adobe programs.
For example cmd+F is "Find" in InDesign. It is "Paste in Front" in Illustrator. This becomes very confusing if you frequently use both programs. I find myself with the "Find Text" dialogue box when I really want to paste an object on top.
If you use many Adobe programs, it is useful to have all of your commands be universal.
Use a bit of discretion when reassigning all of your shortcuts; there are several functions that are more important than others, depending on the program. So if you choose an operation to be universal, make sure that it is truly saving you time in all the programs.
Here's how to set your own shortcuts:
1) In ANY Adobe program go to Edit>Keyboard Shortcuts
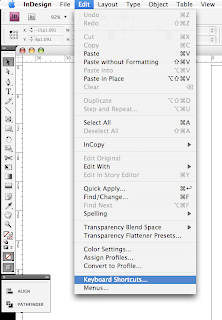
2) You will see a new window with an overwhelming number of options.
To simply define a single action, click on the "Product Area" drop-down box.
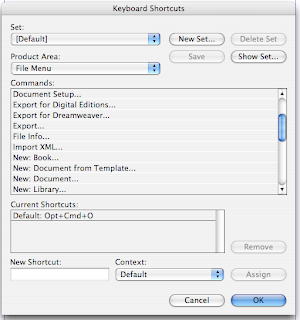
3) In this example I will be changing the "Save As" function.
This is particular function is located under "File Menu".
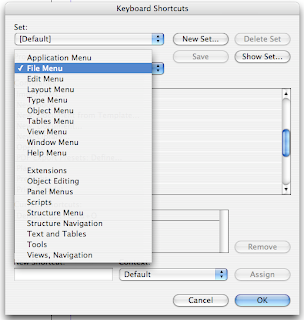
4) Highlight the "Save As" command.
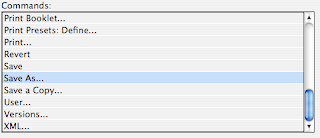
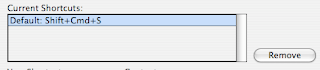
5) You will see the current preset shortcut(if one is not defined, this will be blank).
You can click the "Remove" button to remove it, or proceed to Step 6 to find out how to redefine the shortcut.
6) With the "New Shortcut" box selected, press the new keystrokes that you would like to use.
If you would like to assign them to a particular keystroke set, click on the "Context" dropdown box. Otherwise, the simpler way is to click the "Assign" button.
You have now successfully assigned a new keyboard shortcut!

Some key ones that I use often, on all of my Adobe programs are:
Save: cmd S
Export: cmd E
Place: cmd D
Zoom in: cmd +
Zoom out: cmd -
Zoom 100%: cmd 0
For the full list of shortcuts:
Adobe Indesign CS4
Adobe Photoshop CS4
Adobe Illustrator CS4
Here's how to set your own shortcuts:
1) In ANY Adobe program go to Edit>Keyboard Shortcuts

2) You will see a new window with an overwhelming number of options.
To simply define a single action, click on the "Product Area" drop-down box.

3) In this example I will be changing the "Save As" function.
This is particular function is located under "File Menu".

4) Highlight the "Save As" command.

5) You will see the current preset shortcut(if one is not defined, this will be blank).
You can click the "Remove" button to remove it, or proceed to Step 6 to find out how to redefine the shortcut.

6) With the "New Shortcut" box selected, press the new keystrokes that you would like to use.
If you would like to assign them to a particular keystroke set, click on the "Context" dropdown box. Otherwise, the simpler way is to click the "Assign" button.
You have now successfully assigned a new keyboard shortcut!

Some key ones that I use often, on all of my Adobe programs are:
Save: cmd S
Export: cmd E
Place: cmd D
Zoom in: cmd +
Zoom out: cmd -
Zoom 100%: cmd 0
For the full list of shortcuts:
Adobe Indesign CS4
Adobe Photoshop CS4
Adobe Illustrator CS4
September 2, 2009
Creating Paths and Pasting in Photoshop
Here's a quick way to combine images in Photoshop.
However, i want to touch on an important part of this process which was skimmed over in this tutorial; how to create a selection.
 The magic wand tool is an easy way to select a flat area of color with just one click.
However, it creates very jagged and uneven edges.
 The lasso tool is another option, giving you the power to outline and trace around shapes.
 My favorite is the pen tool.

When using this tool to outline a selection, make sure to select the "Paths" tool and the "Pen tool". Both are respectively highlighted in the above image.
The Paths tool allows you to create a path, and not a shape. The path will appear on the paths, pallet. The shape will appear on your layers palette.
By selecting the Pen tool you are able to draw vector shapes, similarly to those done in Illustrator. The free pen tool creates lines that are less controlled. This is a personal preference, but I would recommend the pen, not the free pen.
However, i want to touch on an important part of this process which was skimmed over in this tutorial; how to create a selection.
 The magic wand tool is an easy way to select a flat area of color with just one click.
However, it creates very jagged and uneven edges.
 The lasso tool is another option, giving you the power to outline and trace around shapes.
 My favorite is the pen tool.
When using this tool to outline a selection, make sure to select the "Paths" tool and the "Pen tool". Both are respectively highlighted in the above image.
The Paths tool allows you to create a path, and not a shape. The path will appear on the paths, pallet. The shape will appear on your layers palette.
By selecting the Pen tool you are able to draw vector shapes, similarly to those done in Illustrator. The free pen tool creates lines that are less controlled. This is a personal preference, but I would recommend the pen, not the free pen.
August 14, 2009
Using the "Align to Decimal" tab in InDesign
Set a character for the decimal tab.
This tutorial will demonstrate how to line up items in a list.
In this example I will be using 2 columns of information, and aligning the decimals in the second column.
1) Type your information. Press the "Tab" key to separate your left column from the right.
If your dollar signs do not line up, don't worry. This may happen if your first column contains a lot of text.
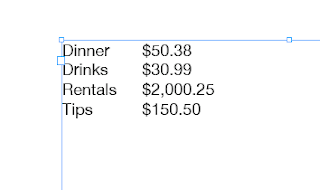
2) Open the Tabs palette (Type>Tabs)

3) Click on the "Align to Decimal" icon in the top left.
When you click this button, notice that the "Align On" box becomes highlighted. Click on the white text field here, and type in the decimal or period.

4. Now you must tell InDesign where you want the decimals to line up.
Select all of your text and click on the ruler on the Tabs bar. A new "tab" will appear on this ruler.

5. You can move the tab manually, or specify the exact numeric location.
To move the tab manually, simply click on the tab icon on the ruler(It's circled in red in the above diagram), and drag it left or right.
To set the exact location, click on the field following the "X:" Type in the value and press return.

You can also view Adobe's tutorial here.
Subscribe to:
Posts (Atom)